Sentry for Single-Page Apps
February 16, 2020
Sentry is an error-monitoring service that helps log, track, and resolve runtime issues in your applications. I’ve used it for quite a while to manage errors in front-end apps that I’ve built and I thought I’d run through some tips and tricks that I’ve found to help make Sentry most useful. We’ll start with some basics and then increase the level of integration, ending with a fully automated Sentry setup with GitHub actions, source maps, and Sentry releases.
You can check an example repo with working examples.
What You’ll Need
- A Sentry account and project
- A Sentry Internal Integration set up with
project:readandreleasespermissions. - A continuous integration tool like Netlify or GitHub Actions
- The
sentry-clipackage
EXAMPLE REPO:
The Basics
Assuming you have an account with Sentry and a project setup, the basics to get up and running with Sentry is to use the browser SDK to initialize it as soon as possible in your app:
import * as Sentry from "@sentry/browser";

Sentry.init({
  dsn: /* your DSN */
});
You can think of the ‘DSN’ as the client key for your particular project. This value is how Sentry ties errors in your runtime to a particular project in the Sentry dashboard. Even with this basic setup you can get some good information about runtime errors. Sentry does a good just wrangling stack traces across browsers to give you as much information as possible without much setup. But, if you’re using any sort of build process where your final asset output is not the same as your original source, you’ll have a hard time diagnosing the rrors reports in Sentry.
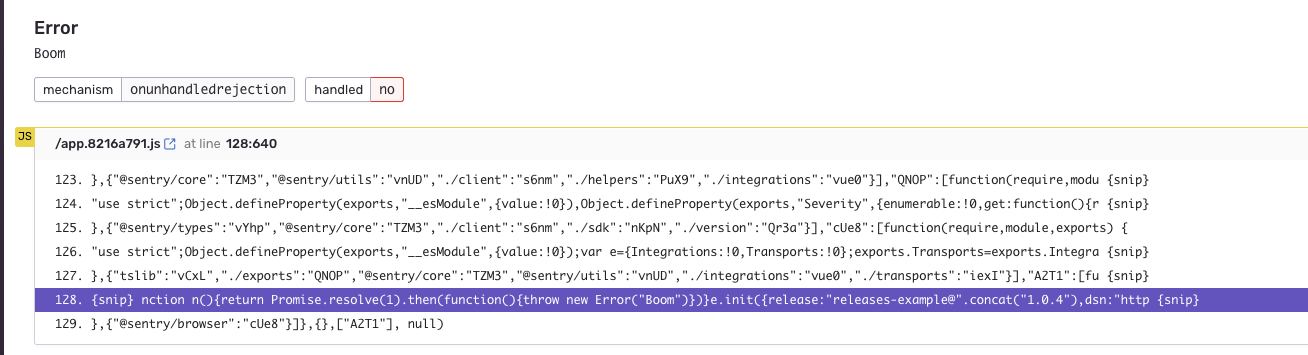
To be able to show the original location of the error from your source files, Sentry needs to access to the source maps of the application. Before we get to sourcemaps, though, we need to talk about Sentry releases.
Releases
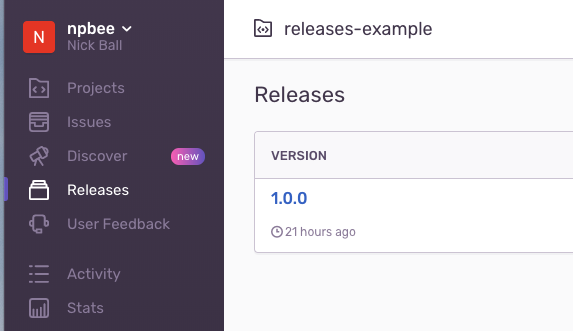
A release in Sentry is a particular build of your app.
It’s how Sentry associates errors to distinct releases of your app.
Typically, any time you build your single-page app you’ll create a new release.
Every release must have a distinct version or identifier so that it can be differentiated from other releases.
This identifier is up to you to create, but typically it will likely be the Git hash of the commit your building, or perhaps the version from the package.json.
import * as Sentry from "@sentry/browser";

Sentry.init({
  dsn: /* your DSN */,
  release: /* your release */
});
Since you won’t want to manually type out your dsn or release value each time, you’ll want to set those up as environment variables that can be read at build time when you’re application is being assembled for release.
The way you include these variables will change depending your toolchain, but most popular bundlers include ways to do this.
For Webpack, you can use the DefinePlugin plugin to make these values available at build time:
new webpack.DefinePlugin({
  SENTRY_DSN: /* However you're including your DSN */,
  SENTRY_RELEASE: /* read from git hash or package.json */,
});
For my example, I’m going to use Parcel because it’s a bit simpler for smaller apps, but the concept is the same.
import * as Sentry from "@sentry/browser";

Sentry.init({
  release: `releases-example@${process.env.npm_package_version}`,
  dsn: /* the dsn */
});
Here I’m using the special process.env.npm_package_version value that Parcel makes available by default.
It will replace the value with the version value from my package.json.
By including the release version in the SDK setup, Sentry will now show this as a ‘release’ and start to associate errors to it:
Ok, back to source maps.
Source Maps
In order to show the original source location for errors, Sentry needs to be able find the source maps for your app. There are two ways to do that: public source maps or direct upload. Public source maps means that Sentry will try to infer the public URL of your source map for the file related to the error, and the fetch that file and use it for the source mapping. Using public source maps is the simplest because it requires the least amount of work on your end and in fact I’ve run apps perfectly fine this way without many issues. However, public source maps can be brittle and have multiple opportunities for something to go wrong, leaving you without source maps for your error logs. Sentry recommends uploading source maps directly and I think it’s a good idea as well. Making the source map upload an explicit part of your build step ensures that you’ll always have source maps for your error logs before you deploy your app.
Building & Uploading Source Maps
Building source maps is another common setting for popular bundlers, and is enabled by default for Parcel.
Running parcel build will automatically create source maps.
The recommended way to upload source maps is to use the @sentry/cli package.
In order to properly associate the source maps with the correct release, we have to use the version identifier we created earlier.
Continuous Integration
Now let’s take what we know and start setting up the commands needed to automate the Sentry workflow we have so far.
Assuming you have some way of running commands for a particular commit or build, we can set up a build command that does what we need so far.
In general, the workflow will be:
- Create a ‘release’ in Sentry
- Build our assets, using the release version from step 1
- Upload the source maps created from step 2, again using the release version
- Finalize the release in Sentry
- Deploy the app
To make all of this happen, we also need at least the following environment variables available:
SENTRY_ORG=xxx
SENTRY_PROJECT=xxx
SENTRY_AUTH_TOKEN=xxx
The way you provide these variables depends on your continuous integration tooling.
For the SENTRY_AUTH_TOKEN, you’ll need to create an Internal Integration within Sentry which will provide you with an authorization token for use with the Sentry CLI.
Here’s an example of how to create the CI command:
// In package.json
{
  "scripts": {
    "build": "./scripts/sentry"
  }
}
#!/bin/bash
VERSION=$(node scripts/get-version.js)
echo "Building version: $VERSION"
npx sentry-cli releases new $VERSION
npx parcel build src/index.html
npx sentry-cli releases files $VERSION upload-sourcemaps dist --rewriteYou’ll notice I’ve created a little helper file for getting the correct version:
console.log(require("../package.json").version);Also notice that I’m using npx to run the Sentry CLI commands.
This makes it easy to install and use the @sentry/cli package that’s installed locally to your project rather than relying on it being installed globally.
After build and uploading source maps, we can then ‘finalize’ the release and, if deploying immediately, mark it as deployed:
# Finalize the release and mark it deployed
npx sentry-cli releases finalize $VERSION
npx sentry-cli releases deploys $VERSION new -e prod
You should now be able to run this on your continuous integration tool and automatically create new Sentry releases with source maps.
Git Integration
There’s more we can do! Sentry can now tell us which location our errors are coming from in our original source, but with a bit more work Sentry can also tell us which commits an error came from. To gain this power, you need to tell Sentry about the commit information associated with each release. Sentry has integrations built for common providers like GitHub that ease the pain of this, but also provides a finer-grained approach which I’ll go through as well. For the GitHub example, after authorizing your GitHub account with Sentry, GitHub will begin sending commit data to Sentry. The step you need to do is tell Sentry which of those commits are associated with the release you’re building. The Sentry CLI has a command to figure this out for you:
npx sentry-cli releases set-commits --auto $VERSIONBest I can tell, this essentially grabs all of the commits between now and the time you last released. With this in, you’ll start seeing commits associated with your release, as well as “suspect” commits in issues:

Alt Git Integration
The Sentry GitHub integration works well and I’d recommend using it if possible. However, you may in a situation where you cannot use Sentry’s integration. For example, if you’re not keen on authorizing Sentry to your GitHub repo. If that’s the case, you can still tell Sentry about commit information, but you’re responsible for finding the right commits, formatting them, and sending them to Sentry’s API. I’ve outlined a quick-and-dirty example of how to do that in the example repo for this post, but essentially it involes what I listed above:
- Fetch the latest release for your project
- From the latest release, find the last commit hash
- Find all of the commits since that commit hash and
HEAD - Format each commit into a “patch set”
- Send all of this info to Sentry’s API when creating the release
Unfortunately this is not straightforward and involves some parsing of the Git log to get the commits in the exact format Sentry’s expects.
Conclusion
Getting fully up and running with Sentry is no easy task, but I think it highly increases the value you can get out of the service.